Showing posts with label Hors d'oeuvre. Show all posts

Monday, October 29, 2012

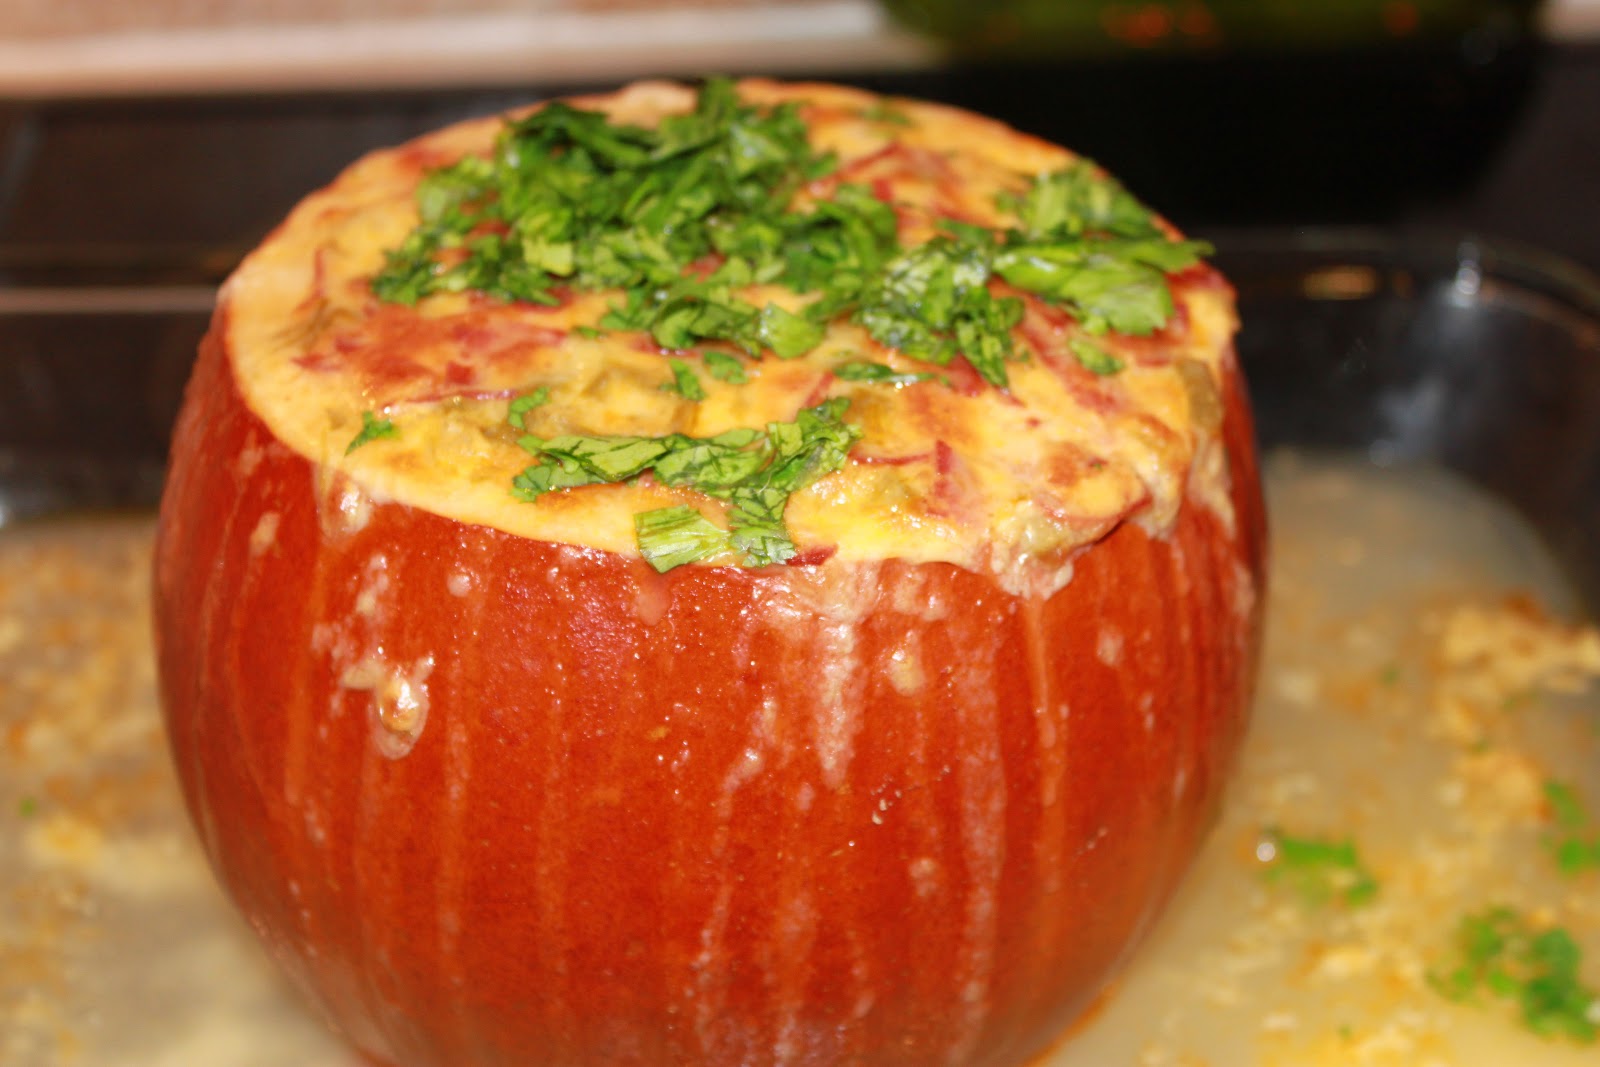
Pumpkin Queso Fundido

Pin It


This past weekend we hightailed it to Lake Toxaway, North Carolina where my son's in laws have a lake house.  We couldn't have picked a better time of the year. Although the leaves were a bit past their prime,  the weather was perfect, warm enough during the day to be able to go out on the lake and chilly at night for a big fire.  On Friday night my daughter in law surprised us with this delicious hors d'oeuvre.  Both grownups and little kids lapped it up... perfect  for Halloween parties and Thanksgiving.

Dinner followed with Shish-kebabs on the grill and mashed potatoes with chives.  The whole menu was incredible.  I am so pleased to see her so enthusiastic and adventurous in the kitchen and so confident now that her recipes are proving to be real winners.  She'll be a force to reckon with very soon.

One of the things I like the best about this recipe is the texture it develops while it cooks.  As the pumpkin bakes in the oven the flesh mixes with the cheese, thickens it and gives it a slight pumpkin flavor.  


Serves 6 to 8

Ingredients
  • 1 2-to-3-pound sugar pumpkin
  • 8 ounces dried chorizo, diced
  • 1 jalapeno pepper (remove seeds for less heat), chopped
  • 1 4-ounce can chopped green chiles
  • 1/2 teaspoon ground cumin
  • 1/4 teaspoon cayenne pepper
  • 3 tablespoons all-purpose flour
  • 1 1/2 cups low-sodium chicken broth
  • 2 cups shredded mozzarella or Oaxaca cheese
  • 1 cup shredded monterey jack cheese
  • Chopped fresh cilantro, for topping
  • Tortilla chips, for serving
Directions


1. Preheat the oven to 375 degrees F. Slice off the top 1 1/2 inches of the pumpkin and discard. Scoop out the seeds and stringy pulp.

2. Heat the chorizo in a medium pot over medium-high heat until the fat begins to render, about 5 minutes. Add the jalapeno, green chiles, cumin and cayenne and cook, stirring, until the jalapeno softens, about 2 minutes. Stir in the flour and cook, stirring, until the flour is slightly toasted, about 2 minutes. Add the chicken broth and bring to a boil. Reduce the heat to medium and stir in the cheeses. Cook, stirring occasionally, until the cheese melts and the mixture is creamy, about 3 more minutes.

3. Place the pumpkin in a small baking dish and fill the pumpkin with the cheese mixture. Add 1 inch of boiling water to the baking dish. Cover loosely with foil and bake until the pumpkin is tender, about 1 hour, 20 minutes. Remove the foil and continue baking until the cheese is golden and bubbly, 20 to 25 more minutes. Let cool 5 to 10 minutes. Sprinkle with cilantro and serve with tortilla chips.


Photograph Lindaraxa
Recipe Food Network Magazine

Tuesday, October 23, 2012

By Request...Fig And Toasted Almond Brie

Pin It


This was the most requested recipe at the ladies lunch and the easiest to prepare. 


INGREDIENTS:

1/2 cup brown sugar

2 tablespoons water

6 fresh figs, stemmed and quartered

1 (14 ounce) round 4 1/4-inch diameter round Brie cheese

1/2 cup toasted almonds

1/2 teaspoon vanilla extract


DIRECTIONS:

Preheat oven to 325 degrees F (165 C).

Heat brown sugar and water in a small saucepan over medium heat until sugar is completely dissolved. Add figs and vanilla, and cook until softened, about 10 minutes. Stir in almonds.  Place brie wheel in a baking dish, and pour fig mixture over the top.

Bake in the preheated oven for 10 to 15 minutes, or until softened but not melted. Serve with crackers or baguette slices.


Recipe Epicurious

Friday, March 18, 2011

Avocado Shrimp Dressed Mexican Style

Pin It


We had a fairly warm day today and I took the opportunity of grilling outside for the third time this year.  Barbecued chicken, corn, pudding, green salad with Roquefort cheese and this marveous appetizer for starters.  An easy menu for the start of the weekend when you are having out of town guests.

I usually serve this with tostadas, purchased at the local taqueria. When summer comes and it's pool time, they make a delightful lunch served after or with cold bowls of gazpacho!

The recipe is from Rick Bayless owner of Frontera Grill and author of Fiesta at Rick's: Fabulous Food For Great Times With Friends.


Fiesta at Rick's: Fabulous Food for Great Times with Friends


Ingredients

12 oz. (about 2 1/2 cups) small-medium cooked shrimp, peeled and deveined

1 medium white onion, cut into 1/4-in. pieces

1 large ripe tomato, cut into 1/4-in. pieces (about 1 cup)

1/4 to 1/3 cup fresh lime juice

Hot green chiles to taste (3 serranos, or 1 to 2 jalapeños), stemmed and roughly chopped

1 medium ripe avocado, pitted, skin removed, and flesh roughly chopped

1/3 cup roughly chopped cilantro, loosely packed and thick bottom stems cut off, plus sprigs for garnish

Salt


Directions


In medium bowl, combine shrimp, onion, and tomato. Pour lime juice into food processor or blender. Cover and turn on. Drop in chiles and, when finely chopped, turn off and add avocado and cilantro. Process until smooth. Thin to creamy consistency with water, about 2 to 3 tbs. Taste and season with salt, about 1 tsp. You will have about 1 1/2 cups dressing.

Mix dressing with shrimp mixture. Cover with plastic wrap directly on surface of shrimp and refrigerate. When ready to serve, transfer to serving bowl and decorate with cilantro sprigs. Makes about 4 cups.

Note:This is best when eaten within an hour or two of being made. Keep refrigerated until just before serving.


Wednesday, March 9, 2011

Chorizo, Mushroom, and Cheese Pizza

Pin It


I have never been a pizza lover until I moved to our house on the lake.  The idea of a greasy, cheesy, rubbery piece of dough with mediocre tomato sauce on top has never wet my appetite, that is, until I discovered two things.  One was the ready made pizza dough in the bakery department of the local Publix store and the other the Emile Henri pizza stone which I featured as a Christmas gift a couple of moths ago.

Emile Henry Flame Top Pizza Stone, Black


Eating a home baked pizza is unlike anything you have tasted before.  For one thing, you are in control of the ingredients and secondly, it is a lot cheaper.  Here innovation  and creativity is the name of the game.  Open your refrigerator and see what you have left over that needs to get put to use and go from there.  Mozzarella is a good standby but any of the cheeses I mentioned below are a good alternative.  Chorizo, ham, tiny meatballs, pancetta, bacon, chicken are great meats and as to vegetables. the sky's the limit.  Don't limit yourself to what you think is an adequate pizza ingredient.

The recipe below is an adaptation from no other than Jacques Pepin who makes pizza often for lunch or slices them for hors d'oeuvre.  There is always pizza dough in his freezer in case of unannounced guests.

I have made quite a few since I got my stone and have gotten quite good at it.  I even gave one to my son for his birthday just so we could compare strategies. This was the last one I made and it was a masterpiece!


It will take you a couple of times to get the dough to your liking.  The longer you leave it on the pan resting after it has cooked, the crispier your pizza will be.  Make sure the stone is preheated at 400 degrees for at least an hour and also take the dough out of the refrigerator and let it rise for and hour or two before filling and baking.  Punch it hard to get rid of the bubbles and work it with your hands around the edges, letting it drop and working quickly.  Put it on top of a lightly floured counter and roll it as thin as you want with a rolling pin.

Make sure you have all the ingredients ready to go before you take the stone out of the oven.  Work quickly when you add the ingredients so the stone doesn't get cold.

If I can make a great pizza, so can you.  It might take you a couple of times but you will be so glad you did!


4 servings

Ingredients

•1 ready-made 12-inch pizza crust

•2 tablespoons good olive oil

•2/3 cup sliced onion

•1 cup coarsely chopped (1/4-inch) chorizo sausage

•2/3 cup coarsely chopped white mushrooms (4–5 mushrooms)

•1 cup thinly sliced green bell pepper strips (or sliced tomatoes which is what I used)

•2 tablespoons thinly sliced garlic

•1/4 teaspoon salt

•1/4 teaspoon freshly ground black pepper

•About 1 1/2 cups sliced cheese, such as St. Albray, fontina, Camembert, mozzarella, Beaufort, or a mixture of these.  You can also use goat cheese!

Directions

Preheat the oven (and the stone if using) to 400 degrees. Brush the bottom of the pizza crust with a little of the oil. Place the crust on a cookie sheet (or stone), sprinkle the onion on top, and evenly distribute the chorizo, mushrooms, bell pepper (or tomatoes), and sliced garlic on the crust. I also added fresh basil.  Sprinkle with the salt and pepper and top with the cheese. Sprinkle on the remaining oil.

Bake for about 20 minutes, or until well browned and crisp. Cut into wedges and serve.


Wednesday, January 12, 2011

Pecorino With Honey & Walnuts

Pin It


I usually don't like to try recipes from people who are not dedicated cooks but in this case an exception was made.

Last month while looking for Christmas decorating ideas in one of my many Carolyne Roehm books,  I came across this picture.  Now, she may be my idol as to table settings and gift wrapping but I would not bet the bank she's a good cook.  Not by the looks of her!  She's too skinny for one and secondly she just doesn't look like the type.  That doesn't mean she doesn't have good recipes that she has probably collected from visiting friends who have fabulous chefs.  So what could go wrong with trying this combination?  After all, I had all the ingredients in my pantry including a huge Pecorino Romano I had recently purchased at Costco!

This is sensational,  particularly after dinner in lieu of dessert;  although, of course, you could serve it as an hors d'oeuvre any time of the year.


Ingredients

½ cup honey
15 walnut halves
1 pound young pecorino toscano

Preheat oven to 450°.

Directions


Mix honey and walnuts in small bowl. Slice pecorino ½" thick and slightly overlap in baking dish. Bake 6 minutes until slightly runny. Pour honey and walnut mixture over cheese. Serve with crusty bread.


Recipe Carolyne Roehm

Friday, November 5, 2010

Camembert Croquettes

Pin It


The holidays are coming and with it a lot of celebrations and parties.  I am sure you will be serving plenty of cheese and crackers, something I try to avoid, particularly if there is something else to choose from. Why spend those calories!

I don't know if you have noticed, but cheese has gotten quite expensive and to top that, guests barely touch it when there are other exiting things being passed around.    In the past, I have been guilty of having a plate of cheese and crackers, as a filler,  and invariably, I end up throwing most of it away after I've tired of the leftovers. Yes, I know, it's an easy thing to pull together but believe me, at a big party,  it will only go to waste.   

To me spending money on cheese makes sense when you serve it like the French, after dinner and before or in lieu of dessert.  Then, by all means, spend it on your favorites, but you don't need to go overboard when three different cheeses will do.  I usually serve a Camembert which, to me, is a little more interesting than a  Brie, paired with one of my favorites, Stilton, and some type of  goat cheese.  Fig marmalade to accompany and English crackers are all you need to go with it, but don't forget the port!

I came across this simple recipe in the Worldwide Gourmet and thought I would share it with you if case you decide to go to Costco and stock up on all their great cheeses.  Great prices but have you notice their size? After a week of making myself sick trying to justify their purchase, I am always looking for things to do with what remains.  In this house, NOTHING, ever gets thrown away.  Remember those poor kids in China?? Who would have thought they would end up supporting our debt!

You can substitute Brie for the Camembert or something else with the same consistency.  Check out the Manchego and Serrano Croquettes I posted awhile back.  They are definitely something I would spend my calories on!

Total time: 30 to 60 minutes

Preparation time: 20 minutes

Cooking time: 20 minutes


Ingredients

- 1 Camembert

- 100 g (6 tbsp.) butter + 20 g (4 tsp.) for the baking sheet

- 40 g (1/4 cup) flour

- 40 g (1/4 cup) cornstarch

- 150 ml (10 tbsp.) milk

- 1 egg

- 1 tbsp. oil

- 250 ml (1 cup) breadcrumbs

- Salt and cayenne

- Oil for frying

Method

1.Make the béchamel sauce: melt the butter; when foamy, add the flour and cornstarch; let color slightly; remove the pan from the heat; whisk the roux while slowly adding the milk; return to the heat and continue whisking until thickened; season with salt and cayenne.

2.remove the rind from the camembert; cut the cheese into strips; add to the béchamel and let melt for 5 minutes, stirring constantly;

3.butter a baking sheet; pour the mixture on it and spread evenly; let cool;

4.heat the frying oil in a pan;

5.in a bowl, beat the egg with 1 tbsp. oil; pour the breadcrumbs in another plate;

6.cut the cheese mixture into squares or sticks; dip each piece in egg, then breadcrumbs; repeat until all the cheese is breaded;

7.fry the croquettes in hot oil for a few minutes; turn so that they brown on both sides; drain on paper towels; place on a serving platter, cover with a cloth to keep them hot and serve immediately.

Cooks Note

Here's an idea..melt some hot pepper jelly or fig preserves and serve as a sauce to accompany the croquettes!

Recipe adapted from Worldwide Gourmet

Thursday, June 10, 2010

Tapas... Fried Garbanzos

Pin It


At the beginning of the year I promised to post some tapas recipes and somehow I got sidetracked when it got cold and we all switched to comfort food.  Well here is one that was on the pike that never got published.  Fried garbanzos or chickpeas are very easy to make and come in handy when you have unexpected guests for cocktails or as part of a tapas buffet.  Place some toothpicks on the side so everyone can help themselves.

Nowadays you can find Pimenton de la Vera in most grocery stores.  I have even seen it at Marshall's!


Ingredients

Olive oil, for frying

1 15-ounce can garbanzos or chickpeas, drained and rinsed

Coarse salt

1/4 to 1/2 teaspoon Pimenton (Spanish wood-smoked paprika)

Directions

Rinse and dry chickpeas thoroughly with paper towels. Set an iron skillet to medium high and add enough olive oil to reach a depth of 1/2 inch.

Slowly add chickpeas to oil, being careful as they may splatter. Fry chickpeas, stirring frequently, until golden brown, 4 to 5 minutes. Transfer to a paper towel-lined baking sheet to drain. Season with salt and pimenton, if desired. Let cool completely, and store in an airtight container.

Wednesday, January 6, 2010

Tapas!...Serrano Ham Croquettes With Manchego Cheese

Pin It
 I am going to start the year with a series of tapa recipes.They are not only great on their own but can also be served as part of the menu for a tapas party.  They are an inexpensive, filling and fun way to entertain, particularly in the present economic times.


Unlike hors'oeuvre, tapas are substantial, being in essence small dishes combined to make a full meal. So... just because we are not making as much money this year, don't think for a minute that we are going to stop entertaining.  We are just going to readjust our thinking and our wallets and think of new and creative ways to have fun and eat well!


These Serrano and Manchego croquettes are served at a restaurant called Sra. Martinez in the Design District in Miami. I had a delightful lunch there last Spring, after visiting the local Farmer's Market with a friend. The chef and owner is Michelle Bernstein, formerly of Azul at the Mandarin Oriental. I thought I had died and gone to heaven!.  Since then, I've been searching high and low for a recipe and I think I've found it.  Make sure you serve them with a fig marmelade on the side.


For my chicken and turkey croquettes click here.

Stay tuned for more tapas recipes, although I am going to stagger them around so we don't get bored!


Serves 8 as a tapa
Makes about 16

Ingredients

2 tablespoons unsalted butter

2 tablespoons olive oil

1/4 cup finely chopped onion

Coarse salt and freshly ground pepper

7 tablespoons all-purpose flour, plus more for shaping

1 3/4 cup whole milk

6 tablespoons finely chopped serrano ham

1/3 cup grated plus 1/4 cup Manchego cheese, (about 1 3/4 ounces)

3 large eggs

1 1/2 cups fresh breadcrumbs

Vegetable oil, for frying

Fresh flat-leaf parsley sprigs, for garnish

Fig Marmelade


Directions

In a food processor process first the cheese into fine crumbs.  Clean the bowl then process the ham until finely minced.  Set both aside until needed.

Heat butter and oil in a medium saucepan over medium heat until butter has melted. Add onion; season with salt and pepper. Cook, stirring occasionally, until onion is translucent, about 3 minutes. Add flour; cook, stirring, 1 minute. Whisk in milk, and cook, whisking, 3 minutes. Whisk in ham and 1/3 cup cheese. Season with salt and pepper as desired. Spread mixture onto a baking sheet, and let cool completely. Mixture can be refrigerated in an airtight container up to 2 days. Croquettes must be very cold before you go to the next step.  I usually make them one day and bread them the next.

Whisk together eggs in a shallow dish. Stir together breadcrumbs and remaining 1/4 cup cheese in another shallow dish. Scoop tablespoons of cooled mixture, and shape with floured hands into 2-inch ovals. Working with 1 oval at a time, coat in beaten egg, then in breadcrumb mixture. Transfer to a baking sheet lined with parchment paper.

Heat 2 1/2 inches oil in a large, heavy stockpot until it registers 375 degrees on a deep-fry thermometer. Working in batches to avoid crowding, fry croquettes, flipping once, until dark golden brown, 1 to 2 minutes total. Using a slotted spoon, transfer to paper towels to drain. (Adjust heat between batches as needed to keep oil at a steady temperature.) Serve warm, garnished with parsley sprigs. Accompany with fig marmelade.

Thursday, December 10, 2009

Ten Inexpensive Christmas Gifts from Your Kitchen

Pin It

There is nothing more welcomed during the holidays than home cooked gifts.  If you have a signature cookie recipe or appetizer  make it to bring as a hostess gift or place under the tree for unexpected guest. If you really like the person, place a card with the recipe attached!  I try to concentrate on things that I know will be appreciated at a time when all of us have so much entertaining to do and so little time to do it. 

You will remember that this summer, when the strawberries were in season and on sale, I suggested you get started making jam so you would have a few gifts out of the way.  Well, if you didn't, there is still time this week!  Below, I have given you a choice of a few things that would be very welcomed at this time of the year.  There are cocktail recipes, bread to enjoy for breakfast on Christmas Day and even something simple like pasta sauce for the home you are visiting and the hostess who is going through all the trouble of entertaining you this year!  At least she wont have to make dinner one night.  If you want to go all the way, get a wicker basket and include a box of premium spaghetti, real Parmiggiano Reggiano a baguette and a nice Chianti.

 Beautiful containers can be purchased for a reasonable price at Marshalls, Target and other discount stores.  Going the extra mile will make anything extra special. Just think Martha Stewart in the wrapping department.

Most of the recipes are in this blog or the sister blog My Kitchen By The Lake.  There are a couple that have links to websites or blogs I like.

Here's a few suggestions:

Spiced Pecans - Wonderful with cocktails

Chicken Liver Mousse - Keeps for at least a week in refrigerator

Kentucky Beer Cheese - Great to have in the fridge

Fresh Strawberry Preserves -  Summer in December!

Candied Orange Rinds - Wonderful alone or with espresso.  Great directions on this site!

Tomato and Basil Sauce - Who wouldn't appreciate this!

Pumpkin Bread - Afternoon tea for the unexpected guest.  Freezes beautifully

Amaretti Cookies - Hard to find anywhere but NYC!

Goat Cheese Log - Leftovers make great addition to an omelette

Individual Pound Cakes - For breakfast, tea or dessert

Photo above:  Martha Stewart.com


Photo Carolyne Roehm

Tuesday, December 8, 2009

Chicken Liver Mousse

Pin It


One of my favorite things to eat during the holidays is French pate...any kind, chicken, goose or duck liver will do!  With the outrageous prices in US dollars for imported goods, I think it is best to make our own this Christmas. 

I have been making this recipe for the last few years.  It is not only delicious and economical,  but also quick and easy to make.  Serve with a chilled Sauternes.  If you want to give it as a present, wrap the ramekin in cellophane tied with a ribbon.

Ingredients

1 pound chicken livers

1/2 pound plus 4 TBS butter, melted

1 egg

2 tsp salt

Pinch of quatre-epices (equal parts nutmeg, allspice, cloves and cinnamon)

Pinch of freshly ground white pepper

2 TBS Cognac

1 baguette


Directions

1. Preheat the oven to 300 degrees F.

2. Brush 6 4-oz ramekins with the 4 TBS melted butter.

3. Process the chicken livers, egg, salt, quatre-epices, pepper, and Cognac in a food processor until fully combines, about 20 seconds. 

4. With the food processor still running, slowly add the 1/2 pound of melted butter. Blend for 15 seconds.

5. Pour the mixture into the ramekins, filling 3/4 of the way.

5. Set the ramekins in a baking dish and fill the baking dish with water to half the height of the ramekins.

6. Bake for 30 minutes.

Let the ramekins cool, and refrigerate until needed.  Run a warm knife around the inner corner of each ramekin, cover with a plate, and then invert.  Serve chilled with baguette toasts.

7. Let the ramekins cool, and then refrigerate until needed.

8. Run a warm knife around the edge of each ramekin, cover with a plate, and invert.

9. Serve chilled with baguette toasts.
Pin It button on image hover