Showing posts with label picnics. Show all posts

Sunday, June 8, 2014

A Father's Day Treat...Chewy Butterscotch Bars With Walnuts

Pin It


Butterscotch bars, or brownies, are one of my all time favorites.  They were a favorite of my father's who, unfortunately, died many years ago when he was only fifty two and of my husband's who was only forty two when he passed away.

Lindaraxa's family hasn't celebrated Father's Day for many years but that doesn't mean we forget those we love on this special occasion... So we bake and we grill and toast them for the few happy years they shared with us. 

This is the original recipe from Nestle's and the one I have been making all these years.  As Madame Mere taught me, you can never go wrong with the recipe in back of a product.  

If you like butterscotch, these are definitely for you.  The only suggestion I have is halve the recipe and bake in a 9 x 11 pan... that is, unless you are baking for a crowd.  Also, I use walnuts, which counterbalances the sweetness of the butterscotch better than other nuts

This is a great dessert to take on picnics or on the boat.  They are a special treat to have around when you are entertaining guests for the weekend.   Come to think of it, they are great anytime!


I know, let's get a male Westie...problem solved!


Chewy Butterscotch Bars With Brownies

Makes 4 dozen brownies  


Ingredients

2 1/2 cups all-purpose flour 

1 teaspoon baking powder 

1/2 teaspoon salt 

1 cup butter, softened 

1 3/4 cups brown sugar, firmly packed 

1 tablespoon vanilla extract 

2 eggs 

1 (11 ounce) package Nestle Toll House butterscotch-flavored morsels, divided 

1 cup walnuts, chopped 


Directions

1. Preheat oven to 350 degrees F. 

2. Combine flour, baking powder, and salt in a medium bowl; set aside. 

3. Beat butter, brown sugar, and vanilla extract in a large mixer bowl until creamy. 

4. Beat in eggs. 

5. Gradually beat in flour mixture. 

6. Stir in 1 cup morsels, and nuts. 

7. Spread into ungreased 13x9-inch baking pan. 

8. Sprinkle with remaining morsels. 

9. Bake for 30 to 40 minutes or until wooden toothpick inserted in center comes out clean. 

10. Cool in pan on wire rack.

Monday, October 17, 2011

Rustic French Meatloaf

Pin It


I have had this recipe tucked away in my files for years and just recently something reminded me of it.  It combines the simplicity of meatloaf with the flavor and depth of a French pâté and goes well paired with buttered boiled potatoes.  Leftover slices naturally make terrific sandwiches, but they’re also wonderful panfried in olive oil. Moreover, it makes an excellent dish, cold or room temperature, for a picnic or tailgating event.

Serves 6

Ingredients

1 cup fine fresh bread crumbs (preferably from a rustic loaf)

1/2 cup whole milk

3/4 cup finely chopped onion

3 large garlic cloves, minced

1 tablespoon olive oil

1/2 lb chicken livers, separated into lobes, trimmed, and rinsed

3/4 lb ground pork

3/4 lb ground veal

1/4 cup chopped prunes

1/4 cup shelled pistachios

 2 teaspoons thyme leaves

2 large eggs, lightly beaten

1/3 cup chopped flat-leaf parsley

Accompaniment: Dijon mustard

Directions

•Preheat oven to 475ºF with rack in middle.

•Soak bread crumbs in milk in a small bowl.

•Cook onion, garlic, and 1/4 tsp each of salt and pepper in oil in a small skillet over medium heat, stirring occasionally, until onion is softened, about 5 minutes. Cool slightly.

•Purée livers in a blender, then transfer to a large bowl. Add pork, veal, prunes, pistachios (if using), thyme, eggs, bread-crumb mixture, onion mixture, 1/2 tsp salt, and 1/4 tsp pepper and gently mix with your hands until just combined.

•Transfer meatloaf mixture to an 8 1/2- by 4 1/2-inch glass loaf pan (see cooks’ note, below) and bake, covered with foil, until an instant-read thermometer inserted into center registers 165ºF, 50 to 55 minutes. Let rest 5 minutes. Cover top of meatloaf with parsley before slicing.

Cooks’ note: You can use a metal loaf pan, but the meatloaf will take about 15 minutes longer to cook.

Serve With: buttered boiled potatoes

Recipe by Kay Chun for Gourmet
Photograph by Romulo Yanes


Sunday, June 19, 2011

An Elegant Picnic For A Concert In Central Park...Filet of Beef On Baguette

Pin It


Summer is full of free concerts in parks all over the nation.  If you are lucky to live near a city that has one, don't miss it.  Boston, Cleveland and New York are the ones that come to mind, even here in Atlanta we have them on Centennial and Piedmont parks.  But there is nothing that comes close to a concert in Central Park!

Years ago, when I worked and lived in New York, I was invited to a few of these concerts by Wall Street firms who entertained their clients by taking them to concerts, opening exhibits at museums, Shakespeare in the Park (my favorite),  or the theater .  One of the firms once took us out for dinner and a cruise around New York harbor. No, I was not wealthy client, but I did manage a lot of money on behalf of some of the largest investment banks in the world.   Just last night, I was cleaning my bookshelves and came across some art books from two exhibitions I was invited to...Matisse at the MOMA and John Singer Sargent at the Whitney, with the business cards still inside!


The New York Philharmonic at the Great Lawn In Central Park

In the summer of 1988,  I decided to take my group to a concert in Central Park.  Everybody came, portfolio managers, sales, operations, traders, the whole lot.   The only mistake was inviting my boss, a charming unattached Scot who proceeded to get drunk and pick up every single girl in sight!  Not exactly what I had in mind.  The concert was spectacular, with Placido Domingo as the star of the evening.  Throw in Linda Rondstat and Gloria Estefan at the end, a full moon and something no one anticipated, 100 degree temperatures!  There is no place in the world that can be more miserable in high heat than New York City, even if you are in a park.


In those days, everybody brought a nice picnic, with chairs and blankets, all very civilized, as New Yorkers can be when asked to behave themselves.  You also have to realize that the people who live in that part of town and the type of audience who would be interested in such a concert is of a certain economic class and very yuppy. 

Should you find yourself in the position of being invited to such an event, grab it. You will remember it for the rest of your life.

Tell me, have you ever been to one of these events? anywhere in the world?


A picnic basket from Picnic At Ascot

For this kind of a picnic you must travel light.  Remember, you will be doing some walking before you get to what you think is an acceptable destination. Getting back home after the concert can take a long time and this is not the type of outing where a town car will be waiting for you at the curb.  Bring your champagne in a portable cooler and the soup in a Thermos.  If you don't have the time to make the bars, pick up some chocolate covered espresso beans.  You will need the caffeine!

This picnic will fit nicely in a picnic basket like the one on top.  All you need is a hunk in great shape to carry it for you.  You might also opt to bring two lighter baskets.  Check out the selction at Picnic at Ascot, they have a lot of choices.  As to a wine, a light red Burgundy or Malbec will go well with this meal.  Nothing too heavy though, remember you will be outside and it's hot. Wine will make you hotter! And don't forget to bring real napkins and plenty of water. You have eight hands to help you carry the load!

The Picnic

Cheese wafers
Black Mission Figs With Prosciutto

 Champagne


Filet Of Beef On Baguette With Horseradish Sauce


Filet of Beef On Baguette With Horseradish Sauce
Yield:4 servings
 .
Ingredients

For the beef:
2 to 3 pounds fillet of beef, trimmed and tied
1 tablespoon unsalted butter, at room temperature
1 teaspoon Dijon mustard
2 teaspoons kosher salt
2 teaspoons coarsely ground black pepper

For the sandwich:
1 French baguette, halved horizontally and cut crosswise in 4
Mustard Horseradish Sauce, recipe follows
1 bunch arugula
Kosher salt
Freshly ground black pepper
Unsalted butter at room temperature

Directions


Preheat the oven to 500 degrees F.

Place the beef on a baking sheet and pat the outside dry with a paper towel. Mix the unsalted butter and mustard together in a small bowl and spread the mixture over the beef with your hands. Sprinkle evenly with the salt and pepper. Roast in the oven for exactly 22 minutes for rare and 25 minutes for medium-rare.

Remove the beef from the oven, cover it tightly with aluminum foil, and allow it to rest at room temperature for 20 minutes. Remove the strings and slice the fillet thickly.

To make the sandwiches, cut the baguette horizontally. Spread the bottom slices thickly with the Mustard Horseradish Sauce. Top with slices of beef and arugula and sprinkle with salt and pepper.

Mustard Horseradish Sauce:

3/4 cup good mayonnaise
1 1/2 tablespoons Dijon mustard
1 tablespoon whole-grain mustard
1/2 tablespoon prepared horseradish
2 tablespoons sour cream
Kosher salt

Whisk together the mayonnaise, mustard, horseradish, sour cream, and a pinch of salt in a small bowl. Serve at room temperature. Yield: 1 cup

I have taken Ina Garten's recipe and adapted it to an open faced sandwich on a baguette.  You can always make them her way but I thought this was a tad more elegant.


These beef sandwiches are wrapped in parchment, tied with baker's twine, and transported in a baking dish that doubles as a serving tray. The watercress is packed separately so that it stays crisp.


Photos # 1 # 2 # 3 Google
#4 Picnic At Ascot #5 Martha Stewart    

Monday, May 9, 2011

Mrs. Guthrie's Vegetable Dip

Pin It

Like Mrs. Adams of baked ham fame in this blog, Mrs. Guthrie was another of my mother's friends who you could always count on for a good recipe.  She would serve this dip on a beautiful silver tray loaded with carrots, zucchini, celery, red pepper, cauliflower, broccoli, cherry tomatoes and anything else in season.  It was the only vegetable tray I have seen frequented equally by ladies and gents, children and adults.

I like the way the vegetables are arranged in the photo above.  Carrot and celery sticks in glasses and everything laid out below.  Much more interesting than arranging everything flat on a platter.

This recipe is from the late 60's and still works today!

Ingredients

1 cup mayonnaise
1 1/2 tsp. curry powder
2 tsp. minced white onion
2 tsp. horseradish
1 tsp. sugar
1 tsp. vinegar
Worcestershire Sauce

Direction

Combine everything in a bowl, chill and serve.

Photo: Stockphoto

Sunday, July 18, 2010

Cold Picnic Paella

Pin It


Some of my best recipes have been created through pure necessity.  If you have been following my other blog, My Kitchen By The Lake, you will know that we have recently "borrowed" my brother's boat and have been going on dinner cruises almost every night.  This is quite taxing on the cook/mate, for she never knows how many are going to show up for dinner or when the mood will strike.

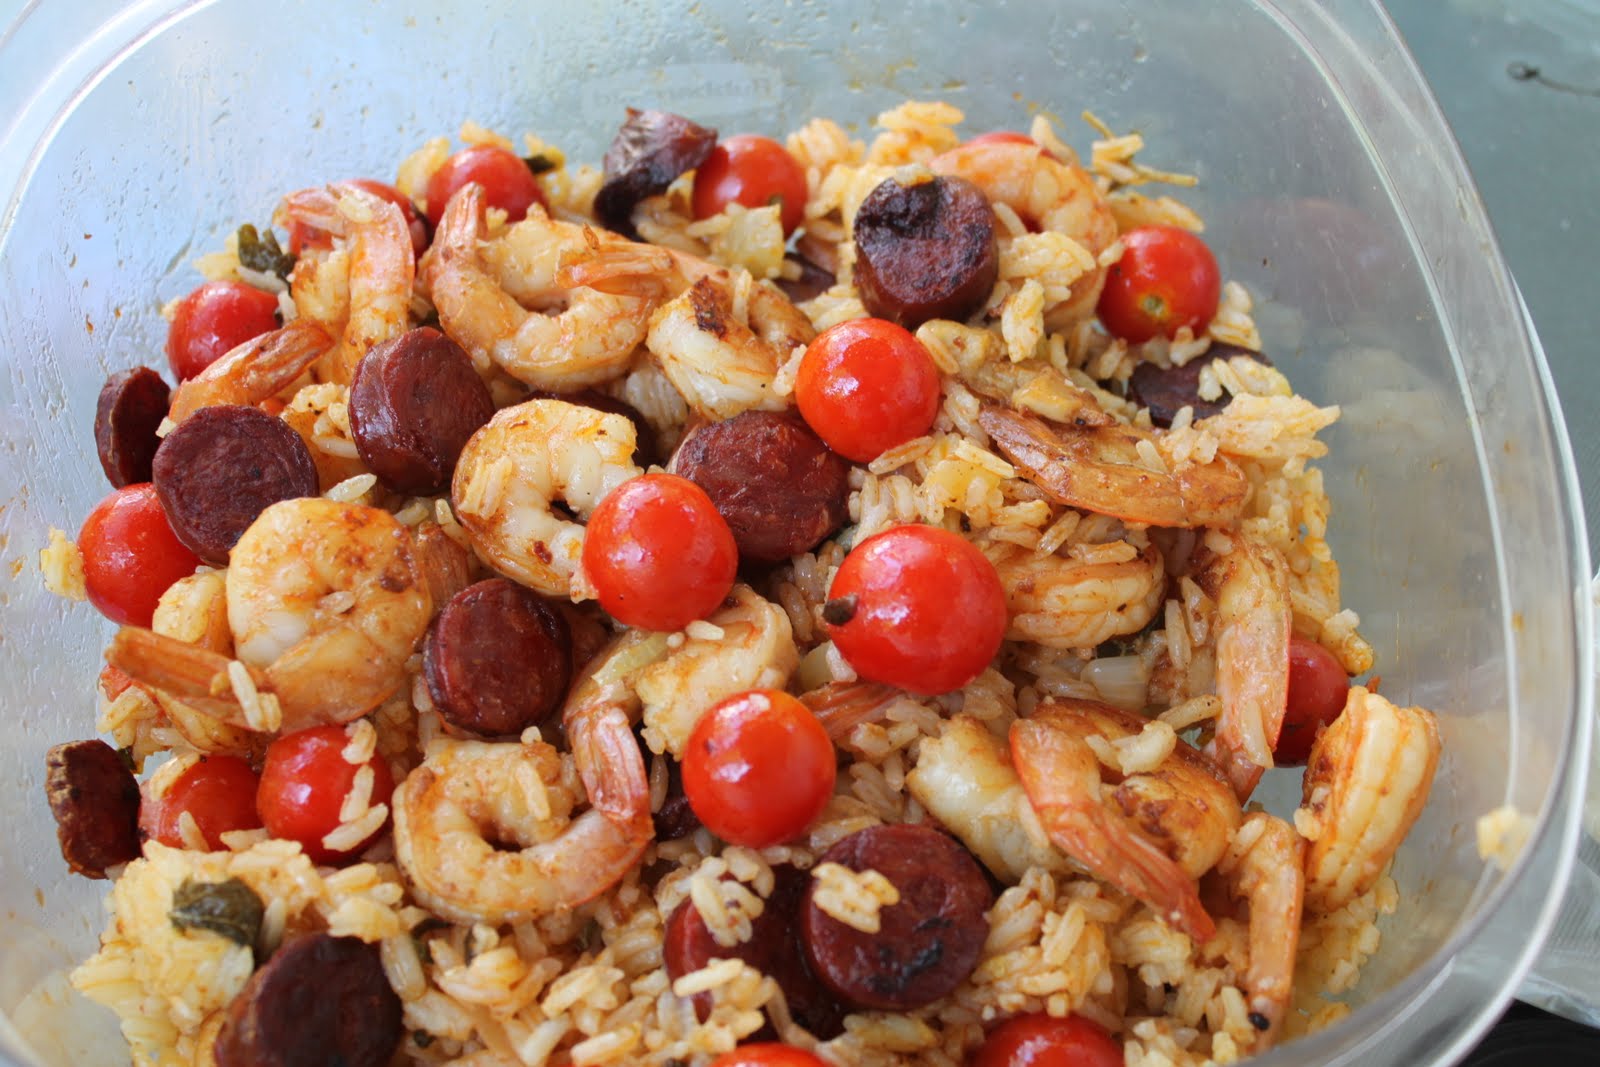
Last night, I got the signal just as I was getting in from the big A and letting the dogs out.  Oh dear, no time to think much, but pack and go.  I had some cold leftover  Zucchini Rice With Red Peppers And Lemon Balm which I had served with bay scallops the night before but definitely not much for a main meal, particularly when there was the possibility of two other  guests.  Luckly, there is always frozen shrimp in the freezer, and plenty of cherry tomatoes which, together with the zucchini, are coming in fast and furious.  Zucchini Gelato anyone? Then, I noticed a couple of chorizos that had been left over from our BBQ on the Fourth and *lightbulb why not pass this off as a cold Picnic Paella?  The funny part is I also had cold chicken in the fridge, talk about a well stocked fridge.


Paella served with a dry French rose


Brie served at the right temperature


A dry French Rose, a perfectly mature Brie and the best yellow cherries I've had in a long time made for a delightful Summer dinner and the perception by everyone that I had spent hours in the kitchen.  The truth is I spent the time it takes to sautee the shrimp and the chorizo and the time it took to mix everything and stick it in a plastic container! In 15 minutes everything was ready to go and the kitchen ship shape.


Cold Picnic Paella

Serves 4

Ingredients

Leftover Zucchini Rice With Onions, Red Peppers And Lemon Balm (cold)
1/2 lbs shrimp peeled, deveined, tails on
2 small Spanish Chorizo (I used El Quijote)
olive oil
Garlic
white or rose wine
Pimenton de la Vera (Sweet Spanish Paprika)
Cherry or grape tomatoes
Cooked cold chicken (optional)
Lemon Balm, chopped
capers (optional)

Directions

First sautee the shrimp in olive oil and garlic. If shrimp is frozen, steam for 3 or 4 minutes ahead.  Add some pimenton and salt while browning.  Add 1/2 cup rose or white wine and reduce.  Remove from stove and set aside.  With a paper towel, wipe pan. Slice the Spanish chorizo in 1/4 in rounds and sautee in a little olive oil.  When they are browned, add to the cold rice with the drippings, the shrimp with leftover oil and garlic, tomatoes and cold chicken if using. If it needs extra olive oil add it now and correct for salt and pepper.

If you are going to serve it within a couple of hours, stick it in the freezer to cool quickly.  If not, cover and store in refrigerator, preferrably overnight.  Bring it out of the refirgerator a good 20 minutes before serving.

The leftover of the leftovers were divine when I had them again for lunch today!

Now, if you want to see beautiful photos of the sunset and the rest of the "dinner cruise" come over to My Kitchen By The Lake.

Photos Lindaraxa

Friday, July 2, 2010

Fourth of July Weekend... Charred Corn Salad

Pin It

Chances are you will have some leftover corn on the cob from one of the meals you serve your guests this weekend.   Don't throw it out...make this the next night.  This salad is wonderful with anything you throw on the grill, including hamburgers on the 4th; or bring it along next time you go on a picnic.  If you can't find jicama, skip it.

One thing you don't want to skip is chipotle chiles in adobo.  These are normally packed in cans with a sauce made of spices, vinegar, tomato sauce and sometimes other chilies. You can use the chiles, the sauce, or both in recipes. Don't worry, when I first made this salad, I had to look it up too!  You will find them in small cans in the Mexican section of the supermarket.  Have you noticed how this area is getting larger by the minute? My supermarket now has two sections!  People in this country have really fallen in love with all this hot and spicy food.  As for me, I have to look up most peppers every time they are included in a recipe.  It is soo confusing, all these peppers.  I have learned one thing though...habaneros are the hotest!

Serves 6-8 

Ingredients:

2 Tbs. fresh lime juice

1 Tbs. fresh orange juice

1 tsp. diced chipotle chili in adobo, plus 1 Tbs. adobo sauce

2 tsp. salt

1 garlic clove, minced

1/2 tsp. honey

1/4 cup plus 2 Tbs. olive oil

6 ears of corn, husks and silks removed

1 can (15 oz.) black beans, rinsed and drained

2 Tbs. chopped fresh cilantro, plus cilantro leaves for garnish*

2 cups cherry or grape tomatoes, quartered

1/2 cup diced jicama

1/4 cup diced red onion

Directions:

In a bowl, whisk together the lime juice, orange juice, chipotle chili and adobo sauce, 1 tsp. of the salt, the garlic, honey and the 1/4 cup olive oil until smooth. Set the vinaigrette aside.

Prepare a hot fire in a grill or preheat a grill pan over high heat.

Rub the ears of corn with the 2 Tbs. olive oil and the remaining 1 tsp. salt. Grill the corn, turning occasionally, until charred in spots, 10 to 15 minutes. Transfer to a platter.

When the corn is cool enough to handle, remove the kernels from the cobs and place the kernels in a large bowl. Add the black beans, chopped cilantro, tomatoes, jicama, onion and vinaigrette and stir until well combined. Garnish with the cilantro leaves. Serve the salad at room temperature. Serves 6 to 8.

*I added 3 TBs

Recipe Williams-Sonoma Kitchen.

Sunday, June 6, 2010

The Kluge Picnic Hamper And Others For the Rest Of Us

Pin It


Yesterday as I was researching this post,  I noticed Emily Evans Eerdman had just come out with a post on Christy's auction of the contents of Albemarle House, Patricia Kluge's estate in Virginia.  As I looked into it some more, I realized that after the Kluge divorce, John Kluge remarried and built another house nearby, Molvern, whose contents had been auctioned, also by Christy's, in 2005.  This incredible picnic hamper which had caught my attention and was to be the piece de resistance of this post, was part of that auction.  To read more, click article from the NYT which appeared in December 2005.

Commissioned in the 1980's by the Kluges from the London firm of Asprey, jewellers and silversmith to the British Royal Family, this picnic hamper is undoubtedly  the pinnacle of sophistication. Containing a full service of just about everything imaginable for a party of sixteen, the hamper can be towed to the perfect picnic location by hooking it to the back of a tractor. The wicker trailer holds about 15 wicker cases, each fitted with brass handles and leather straps, with battery-powered hot and cold boxes and a water pump, cases for Bernardaud Limoges china, Baccarat crystal, Asprey silver cutlery, a staghorn bar service, two folding mahogany tables and 16 chairs, each with the monogram "K." The set was estimated at $20,000 to $30,000 and sold for a whopping $144,000.

Although day-trippers have used wicker carryalls since the 1700s, the true picnic basket was born in 1901, when British luxury-goods retailers like Asprey started stocking hampers filled with tableware for motorists to enjoy on country drives. While modern options start at about $80, this four-person set from 1908 — made by travel outfitter G.W. Scott & Sons, and complete with copper kettle and burner — recently sold at auction for $3,500.


If you can forget for a minute the Kluge picnic hamper and concentrate on reality, here are some pretty and practical hampers.  I know its hard, just try...


Faux-leather trim and a plaid lining give Sutherland Baskets' two-setting case western flavor. ($54.99; picnicbaskets.com)


Optima fills its handmade cases with vintage china, glassware, and embroidered linens for two. ($350; picnicfun.com)


The Bargain Picnic Basket


Simple mugs say brunch; a corkscrew means this set can handle cocktail hour for four, too. ($43.99; picnicbeyond.com)


There's always the metro picnic basket which you can initial to add a touch of chic!

For more on picnics and getting organized click here

Wednesday, April 8, 2009

Deviled Eggs

Pin It


There are a million combinations for deviled eggs, from capers and tarragon, to plain old paprika and mustard. Experiment with what you like, and make them your own. In the meantime, try these. For big holiday meals such as this, I go light on hors d'oeuvres, but for Easter, I like to pass these around just before we sit down for lunch.

Ingredients

12 large eggs
1/2 cup mayonnaise
1 1/2 to 2 teaspoon Dijon mustard or Durkees Famous Sauce
1/4 teaspoon cayenne
Salt
Special equipment: a pastry bag fitted with 1/2-inch star tip (optional)
Garnishes: paprika, chopped fresh chives or Parmesan cheese

Directions

Cover eggs with cold water by 1 1/2 inches in a 3-quart heavy saucepan and bring to a rolling boil, partially covered. Reduce heat to low and cook eggs, covered completely, for 1 min. Remove from heat and let stand, covered, 15 minutes. Transfer eggs with a slotted spoon to a bowl of ice and cold water to stop cooking and let stand 5 minutes.

Peel eggs and halve lengthwise. Carefully remove yolks and mash in a bowl with a fork. Add mayonnaise, mustard, and cayenne and stir with fork until smooth, then season with salt and pepper. Fill pastry bag with yolk mixture and pipe into egg whites. I like mine garnished with Parmesan cheese and paprika on top, but the choice is yours.

Pin It button on image hover